Home > Spotify Music Tips >Cancel Spotify Subscription without Downloads Loss
How to Cancel Spotify Subscription without Downloads Loss
With millions of users worldwide, Spotify has become one of the leading music streaming services. However, there are various reasons why someone might want to cancel their Spotify subscription. Whether it's due to financial constraints, a change in music preferences, or simply a desire to take a break from streaming services, knowing how to cancel your subscription is essential.
This article will guide you through the process of canceling your subscription and provide tips on how to save your Spotify downloads after canceling your subscription.
Part 1. What Happens After Spotify Cancellation?
When a user cancels their Premium subscription, they will lose access to several key features, with the most significant impact being on downloaded content. Premium subscribers enjoy the ability to download music and podcasts for offline listening, which is particularly useful for those who want to enjoy their favorite tracks without using mobile data or when they are in areas with limited internet connectivity. However, once the subscription is canceled, all downloaded content becomes unavailable.
While playlists and saved songs will still be accessible in the user's library, any music that was specifically downloaded for offline use will be removed from the device. This means that users will no longer be able to listen to those tracks without an internet connection. Instead, they will need to stream the music, which requires an active internet connection and will include ads in the free version of Spotify.
Part 2. Preparation for Cancellation: Keep Spotify Downloads From Losing
Spotify allows users to create and manage playlists easily. To ensure you don’t lose track of your favorite music, consider backing up your playlists.
The Tool You Require:
NoteCable Spotify Music Converter allows you to download music directly from Spotify to your computer, converting protected audio into plain tracks. These converted tracks are compatible with most players, meaning you can keep your favorite songs permanently, regardless of your subscription status. Importantly, NoteCable maintains the original sound quality. For detailed guides on downloading and converting Spotify music, you can refer to:
 If you need a solution for converting songs, albums or playlists from any streaming platforms (such as Spotify, Apple Music, Tidal, Amazon Music, Deezer, YouTube, YouTube Music, SoundCloud, DailyMotion, and more) to MP3 format, All-In-One Music Converter is the perfect choice.
Steps to Download Spotify Music to Computer Local Place
Step 1Install and run NoteCable on your computer.
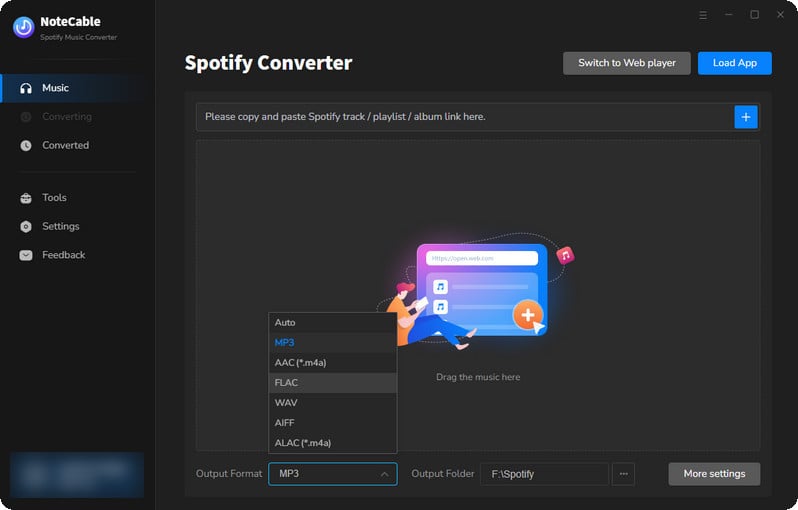
Step 2Import songs into NoteCable to parse.
Method 1: Copy and paste the link of track/playlist/album to the designated column.
Method 2: Drag the track/playlist/album to the mainface.
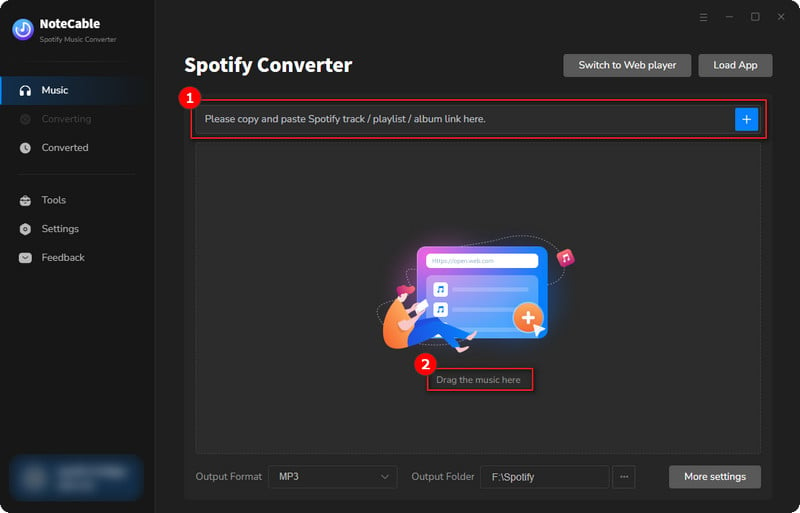
Step 3Navigate to "Settings" where you can customize the output parameter to your needs, such as Output Format, Bit Rate, Sample Rate, Storage Location, etc.

Step 4Once you've completed the above steps, simply click the "Convert" button and NoteCable will start downloading songs from Spotify as your settings.
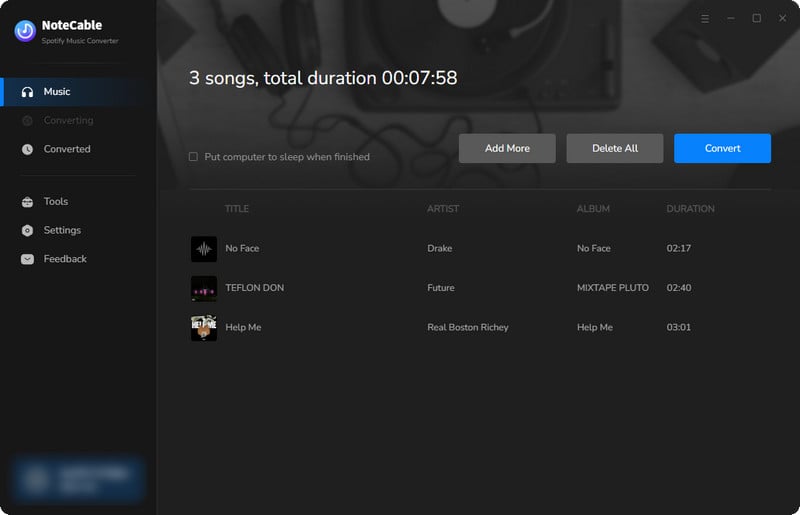
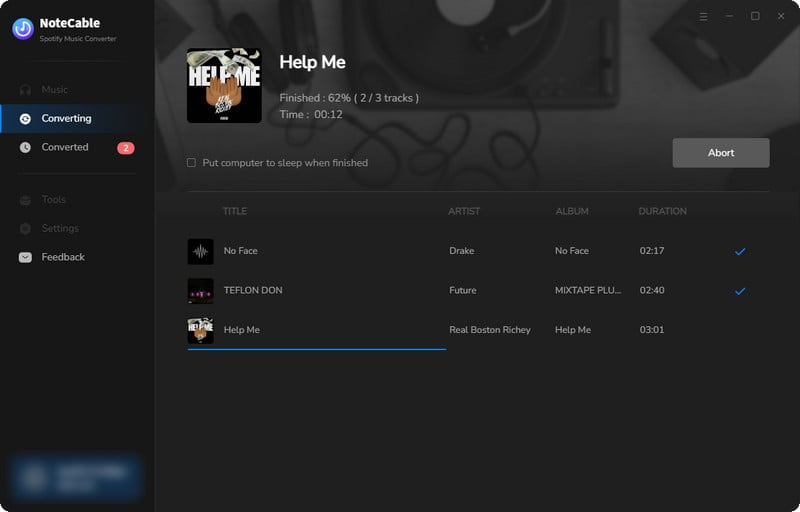
To ensure smooth downloading, please do not switch to other programs during the process.
Step 5Once the download is done, click the History tab and you’ll find the Spotify downloads on your local drive.
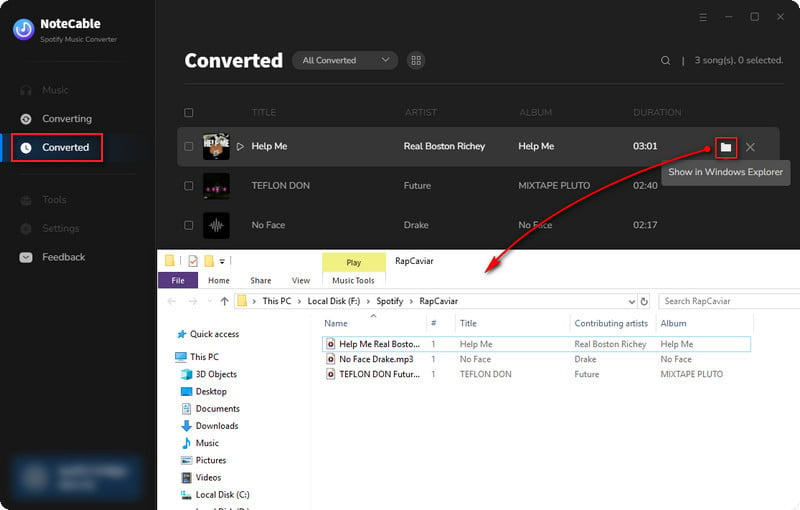
With NoteCable Spotify Music Converter, you have successfully backed up your Spotify downloads. Even if you cancel your subscription or it expires, you will not lose these music. What's more worth mentioning is that if you are a Spotify free user, you can also use NoteCable to download Spotify music for offline listening.
Part 3. How to Cancel Spotify Subscription on Different Devices?
-On Desktop (Web Browser)
Step 1 Open your web browser and go to the Spotify website, then log in to your account using your credentials.
Step 2 Click on your profile picture in the top right corner and select "Account" from the dropdown menu.
Step 3 In the account overview, look for the "Your Plan" section. Click on "Change Plan".
Step 4 Scroll down to the bottom and find the option to "Cancel Premium". Click it.
Step 5 Follow the prompts to confirm the cancellation.
-On Mobile (iOS or Android)
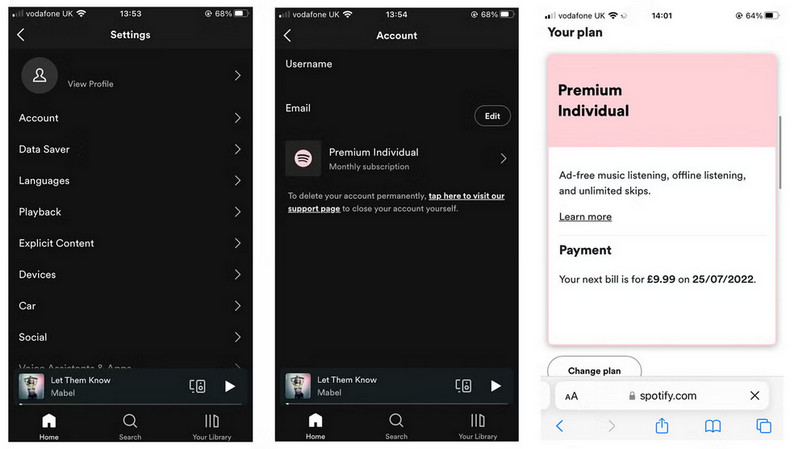
Step 1 Open the Spotify app on your device.
Step 2 Tap on "Home" at the bottom left.
Step 3 Tap on the gear icon (Settings) in the top right corner.
Step 4 Tap on "Account".
Step 5 You will be redirected to your account in the web browser. Follow the steps from the desktop section starting from Step 4.
-On iPhone or iPad (via App Store)
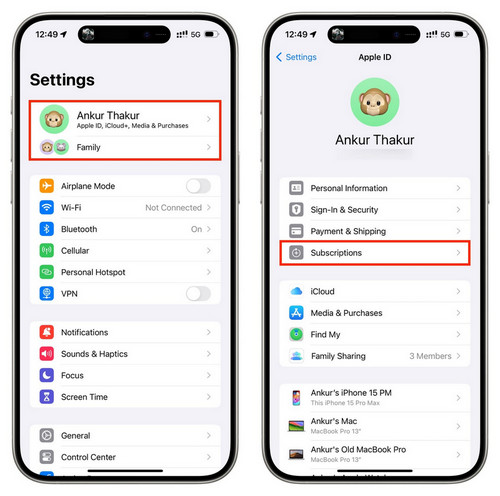
Step 1 Open the Settings app on your device.
Step 2 Tap on your name at the top to access Apple ID settings.
Step 3 Tap on the gear icon (Settings) in the top right corner, and choose "Subscriptions" option.
Step 4 Find and select Spotify from the list.
Step 5 Tap on "Cancel Subscription" and confirm your cancellation.
-On Android (via Google Play Store)
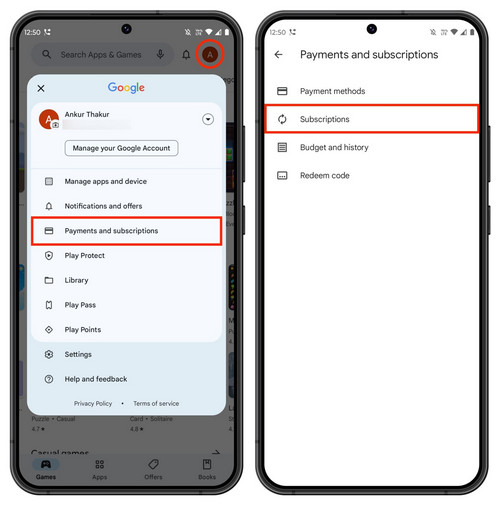
Step 1 Open the Google Play Store app.
Step 2 Tap on the menu icon (three horizontal lines) in the top left corner.
Step 3 Select "Subscriptions", find and tap on Spotify.
Step 4 Tap on "Cancel Subscription" and follow the prompts to confirm.
-On a Smart TV or Gaming Console
Step 1 Open the Spotify app on your smart TV or gaming console.
Step 2 Navigate to "Settings" or "Account".
Step 3 You may need to log in to your account via a web browser to cancel, as many devices do not support direct cancellation through the app.
Summary
This article details the steps to cancel your Spotify subscription and explains how to save your downloaded Spotify music to prevent loss. Simply use NoteCable Spotify Music Converter and you can save your Spotify music forever. If you need further specific steps or additional information, please feel free to ask!


